How to Change Automatic Transmission Filters
Filter change
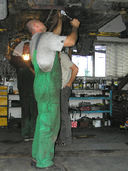
Over time transmission fluid, like engine oil, will lose viscosity and its ability to adequately lubricate and cool moving parts. The recommended duration between transmission fluid & filter changes is set by the Manufacturer and affected by the driving conditions and number of miles driven. If you pull the dipstick and the fluid smells burnt, it most likely needs changing. If you notice the transmission slipping or shifting too soon or too late, besides changing the fluid & filter, you should probably have the shift control bands adjusted as well. I will describe the fluid & Filter changing procedure with the vehicle on a lift.
|
Things You'll Need:
* Siphon Pump * Fel-Pro Transmission Filter & Gasket Kit * Narrow Putty Knife * Blade Scraper * Strong Ceramic Magnet * Gasket Adhesive such as #2 Permatex Gasket Maker * Two Medium sized Ball-Peen Hammers * 1 Deep well socket (just larger than that needed to remove the bolts) * Table Vise * The correct type and amount of fluid to refill * zMax Transmission Formula (micro-lubricant) |
#ad |
#ad |
|
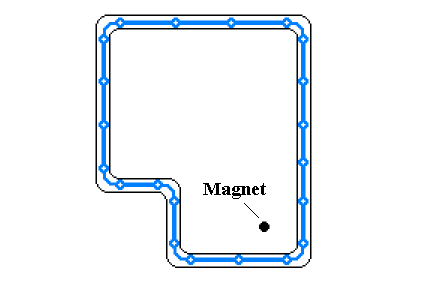
1. Pressure-wash the engine, transmission and undercarriage ahead of time, do yourself and/or your Mechanic a huge favor. Allow the Transmission to cool down, if possible, to avoid high heat from the fluid as well as from the catalytic converter. Insert the intake hose of a Siphon Pump through the dip stick tube into the bottom of the drain pan. Siphon off as much fluid as you can. If the Transmission pan has a drain plug, you may omit this step. 2. Raise the vehicle on a lift, for easy access. If necessary, remove any cross members blocking access to the pan or pan bolts. If unable to do this, loosen or remove the Transmission mounting bolts at the cross member and tail stock, gently raising the Transmission to gain access. (see warnings below) 3. Remove the pan bolts, leaving two in place on opposite sides. Slide your oil drain/reservoir into place and top it with a wide catch pan. Back the remaining bolts out halfway. Use a putty knife to gently separate the pan and gasket, taking care not to bend the lip of the pan. Then, remove the last two bolts and carefully lower the pan. If you find a plastic dust cap inside of the pan, discard it. The dust cap originally sealed the dip stick port and is forced inside as the tube is installed on the assembly line. 4. Remove the retaining clip or bolt holding the filter in place. Check the filter stem for the old O-ring seal. If you don't see it, you will need to fish it out of the port using a seal pick. Take a shop rag and wipe down the valve body to remove any remaining fluid and sediment. Install the new O-ring seal & filter from the kit, wetting the O-ring with clean fluid, before installing the filter and securing it in place. 5. Clean the pan of fluid and sediment. If it has a magnet, clean that too. If not, install one where it will clear the filter pick-up. Use a putty knife and blade scraper (or wire wheel) to remove any old gasket material from the pan as well as from the Transmission mating surface. Take care not to gouge the metal with your tools.  Peening the pan Peening the pan
6. Peen the pan to ensure a tight fit. Chock a deep well socket into the end of a table vise. Use a short extension to gain clearance, if necessary. With the pan in the upright position, carefully center a bolt hole over the socket. Place the ball end of one hammer into the bolt hole and tap the face end with the other hammer. This creates a slight concave curve of the bolt hole which helps spread the pressure of the bolts to assist in an even seal of the gasket. The raised side of this curve should point towards the bolt head, in the installed position. The warpage corrected by peening the bolt holes is caused when pan bolts are repeatedly tightened, exceeding recommended torque in an effort to stop a gasket leak. Consult your vehicle's repair manual, for the proper torque specifications.
 Gasket Adhesive Gasket Adhesive
7. Apply a thin/even bead of gasket adhesive to the lip of the pan, circling all of the bolt holes. Carefully apply the new Fel-Pro gasket. Flip the pan over onto a clean/flat surface and apply light/even pressure to seat the gasket. If you have the time, allow the Permatex to cure with the pan in this position for at least 10 minutes.
8. Remove any gasket adhesive that may have oozed into the bolt holes, before re-installing the pan. Start the bolts by hand, to avoid cross threading. Tighten the bolts gradually, in a zig-zag pattern, to the recommended torque. Do this in stages with the last being the final specified torque. This helps prevent damage to the gasket.
9. Re-install any cross members or Transmission mounts previously removed. Lower the vehicle to the ground, keeping it on the lift. 10. Add a micro-lubricant plus half of the recommended fluid, periodically checking the cold level on the dip-stick. Keep in mind that some of the old fluid most likely remained in the torque converter. 11. Start the engine, once you have reached the cold level. With the parking brake set, place the Transmission in drive. For front wheel drive vehicles, hold the brake pedal to prevent the drive wheels from spinning. Allow the vehicle to idle until the engine reaches operating temperature. Slowly shift the Transmission through all gears then brake to a stop before putting it back into park, before rechecking the fluid level. If you find the level above the hot mark, use the Siphon pump to remove the excess. If you find it low, add the necessary amount. 12. Raise the vehicle and check for leaks, before removing it from the lift. Again, avoid the high heat from the catalytic converter! Tips: * Adding a micro-lubricant will extend the life of your transmission by conditioning the moving parts. * Applying gasket adhesive to only one side of the new gasket assures that the gasket will not split or slip out of place. * If this is an off vehicle replacement, be sure to remove and clean the torque converter, to remove the remainder of the old fluid. * An off vehicle replacement is the ideal time to consider switching to synthetic transmission fluid. Warnings: * Any time you remove a cross member or raise up on the Transmission, you risk the breather coming into contact with the underside of the hood. To minimize this risk, simply raise the hood & remove the breather. * On a rear wheel drive vehicle; raising the engine/transmission up too far could cause a pulley mounted cooling fan to come into contact with the Radiator or fan shroud. Copyright 2/27/2009 All Rights Reserved. Questions? Comments? Contact Me Related Articles: Automotive #ad
|
|