How to Control Outdoor and Ceiling Lights with a Timer
Timed Circuit
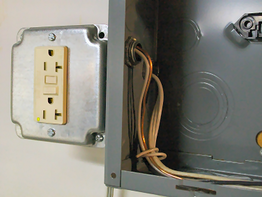
Control outside lights or indoor ceiling fixtures with an appliance timer added to the circuit at the circuit breaker panel. Besides convenience, this makes an empty house look occupied as a deterrent to burglars. For this, you will need a 20 amp. dedicated GFCI receptacle at the breaker panel. Although this receptacle must be a ground fault rated at 20 amps, to comply with NEC requirements, the breaker protecting the circuit must also be correct for the load. This tutorial depicts a pre-existing 20 Amp. circuit; a lighting circuit, wired with 12/2 Romex instead of 14/2, which also includes one outdoor (GFCI) receptacle. If the circuit you time is rated 15 amps, feed the panel receptacle from that [15 amp] breaker instead of the 20 amp breaker the ground fault was installed with, so as not to over-protect the circuit.
|
You'll Need:
* Dedicated 20A GFCI breaker panel receptacle * 1/2" Cable Connector. * Appliance Timer (three-pronged) * 4 feet of heavy electrical cord w/ ready made three-pronged plug * 3-WT51-Yellow wire connectors (wire nuts) 1. Identify which breaker in the panel protects the lighting circuit you wish to place on a timer and switch it OFF.
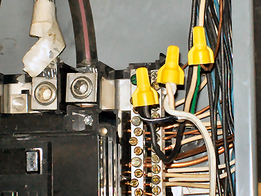
2. Disconnect the lighting circuit by removing the hot from the breaker and the neutral and ground connected to the bar. Position these wires so that they do not come near enough to contact other live circuits inside of the panel. 3. Remove the 1/2" knock out closest to your breaker panel receptacle and install a 1/2" cable connector. Feed a length of pre-made heavy electrical cord through the connector around the panel and up to the hot, neutral and ground wires of the lighting circuit. Connect these with wire nuts and corner the cable. Tighten the clamp at the cable connector. Replace the circuit breaker panel cover.
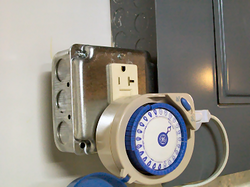
4. Set the pre-programmed appliance timer to automatic, plug it into the panel receptacle and plug the circuit-cord into the timer. Without an appliance timer, you may need a two-pronged adapter. Turn both the circuit breaker and light switch to the ON position. The light(s) will now turn on & off automatically for the preset duration(s). Tips: * Typical residential lighting circuits are wired with 14 gauge wire and protected by 15 amp. breakers. * Typical residential receptacle circuits are wired with 12 gauge wire and protected by 20 amp. breakers. * Use a digital appliance timer with battery backup, if power frequently fails. * Digital timers allow programming different times of the day for different days of the week, to break routine. * Even heavy duty 10 gauge extension cords show a 15 amp rating right on the package. The cord shown in this tutorial was removed from a fluorescent light fixture. * Have a damaged outdoor extension cord with 4 good feet at the plug end? Warning: * Over-protecting a circuit with a higher amp-rated breaker is not suggested or recommended and may not prevent an electrical fire. * If the cord or two-pronged adapter feel hot during use, it is under-rated for the job. * DO NOT attempt to control multiple perimeter security flood lights on this residential-type circuit, if the initial switch-on amp draw exceeds the lowest [15] amp rating. Remember, a chain is only as strong as its weakest link. Copyright 10/09/2012 All Rights Reserved. Questions? Comments? Contact Me DISCLAIMER: All Electrical tutorials are meant for those with some working knowledge of residential electrical wiring and should not be attempted by first-time novices. Does the job require a Permit? Check with your local Building Code/Inspection office. |
|