How to Disable your built-in Microphone

Disable Microphone
In 2013, revelations into the true-scale of the Obama administrations NSA Surveillance programs beg the question of whether or not the built-in microphone in your computer is listening to you without your knowledge or consent. Protect your privacy now!
The following, easy to follow tutorial, details how to disable a built-in microphone on PC's Laptops and Tablets running Microsoft Windows 7 through at least 10.
What You'll Need:
* Laptop or Tablet running Windows 7-10
* Administrative privileges
The following, easy to follow tutorial, details how to disable a built-in microphone on PC's Laptops and Tablets running Microsoft Windows 7 through at least 10.
What You'll Need:
* Laptop or Tablet running Windows 7-10
* Administrative privileges
 Disable built-in Microphone Disable built-in Microphone
1. Open Control Panel from the Start button, icon view, then click to open Sound. Click the Recording tab, then click to highlight Microphone. Click on the Properties button, then scroll the drop down list and select "Don't use this device (disable)."
2. Click OK to close out all windows except for the Control Panel.
3. Verify that your built-in mic either shows as Disabled or does not show up at all, depending on your version. In Control Panel, open the Device Manager then open Audio inputs and outputs. Built-in mic may show as Disabled or the device will not appear. 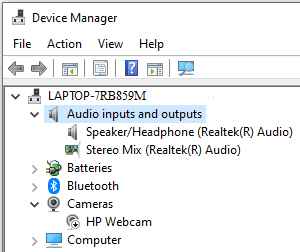
Audio inputs and outputs
Tips:
* Reverse this process in order to use your built-in microphone. Warnings: * Check periodically to verify that the device was not surreptitiously re-enabled by spyware disguised as an "update." * If you have video chat programs installed, such as FaceTime, Skype or Zoom, check often! Original Copyright 03/16/2014 All Rights Reserved. Questions? Comments? Contact Me Related Articles: How to Disable sharing on Windows 7 and 8 How to Disable your webcam |
|