How to Replace a Door Panel
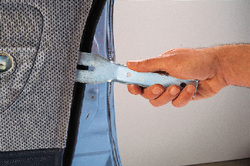
Door panel remover
If you need to remove an automotive door panel for replacement, gain access to lube the window track, replace a power window motor, lube or repair lock & latch linkage, replace a blown stereo speaker, or do auto body repair/waterproofing, you will need a few simple tools and basic knowledge of door construction.
|
Things You'll Need:
* Door Panel Removal Tool * Phillips Screw Driver * 1/4" Socket Set |
#ad |
|
1. Search the entire door for metal fasteners, before trying to pry the plastic clips out. Unscrew the lock knob if it protrudes through the top of the panel. Remove pull straps by prying off the cover plates and remove the attaching screws. Search all around the arm rest. If you find an ashtray, take it out and remove the hidden screw. If the arm rest or panel includes a power window/lock switch, carefully remove it and the screw beneath. If the door has a mirror control knob, check for screws that might penetrate through the door panel.
 Jesus Clips
on Amazon Jesus Clips
on Amazon
2. Remove the window crank retainer or "Jesus Clip," named for the Omega shape, provided the door has a mechanical window. You can make a small hook out of a paper clip or a length of solid 14-16 gauge steel wire. Push inward on the panel and insert the hook between the handle and the plastic washer. The loop of the clip will be inline with the handle, one direction or the other. Once you have it hooked, pull slowly. Be very careful not to lose this clip!
3. Grab the door panel removal tool, once you have removed all visible fasteners. Insert the tool between the door panel and the sound-dampening paper and slide it along until it hits a plastic clip. Pull it out slowly, and reinsert it with the clip between the opening. Prying against the door, pull the clip outward. Proceed to the next until you have extracted them all. Depending on the door panel design, raise up on the panel clear the lock rod. You may also need to pull the door handle outwards before you can slide the panel toward the hinge for removal. 4. Gain access to the inside of the door by carefully removing the sound-dampening membrane. This membrane also blocks out drafts. Take care not to damage it. Since you now have access to all the inner workings of the door, this is the opportune time to lubricate the window track, lock and latch mechanisms. Without reinstalling the locking clip, slide the window crank onto the splined shaft and roll the window down part way to access the track. Or, in the case of power windows, plug the switch back into the harness. Carefully, direct a spray of white lithium grease on all of the linkage joints and window tracks. 5. Recreate a damaged sound-proof membrane by using 3-mil plastic or roofing felt. Cut it to match the shape of the door panel. At least, cut it to cover all of the openings on the inside of the door. Make cutouts for the door handle, arm rest bracket, window crank, and speaker, as well as for all of the plastic clips. You can attach it to the door with double-stick tape or small dabs of silicone caulk. 6. Replace the door panel in reverse order of removal. Roll the window down and out of the way. You will most likely have to line up the threaded lock rod and door handle first, before setting the upper lip of the panel into the window channel. Tips * To reinstall the window crank, first install the retaining clip into the slot on the collar of the crank. Then, holding the crank in the desired position, press it onto the splined shaft until the clip snaps into the groove. Warnings * If you do not reinstall a SOLID membrane between the door and panel, you will most likely hear road noise and feel a draft while driving. Copyright 01/17/2009 All Rights Reserved. Questions? Comments? Contact Me Photo Credit: S&G Tool Aid 87650 Crutchfield.com
#ad |
#ad |