How to Defragment the Paging File aka Virtual RAM
Defragmentation
The Paging file, also known as the swap file, virtual memory or virtual RAM (Random Access Memory), is hard drive space use by the system during times when installed RAM becomes insufficient to run a program or series of simultaneous operations. The System will temporarily move data to and from the paging file as needed, to free up RAM. This allocated space can only be defragmented while it is not in use. To effectively accomplish this, the paging file must be zeroed out. Defragging the paging file does improve overall System Performance. But, the computer can read data from installed RAM much faster. Increasing the amount of installed RAM, whenever possible, is always the best option when attempting to improve computer performance.
Things You'll Need:
* Microsoft Windows Operating System XP - Win8
* Microsoft Windows Operating System XP - Win8
 Error-Checking Error-Checking
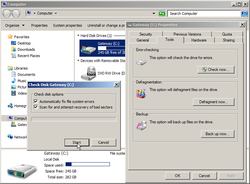
1. Run Error-checking first! Do this by opening My Computer and right-click on your main hard drive (usually C:) and click on Properties. Click the Tools tab then click Error-checking (checkdisk/scandisk). Once there, click on Check now... If you get a User Account Control pop up, click Yes. In the next window, check all boxes before clicking on Start. This will be followed by another window letting you know that the disk can't be checked while it is in use (or that you must schedule a disk check requiring a restart). Click on OK, then initiate the restart. This 5-stage process may take a considerable amount of time, depending on the size of your hard drive.
2. Run Disk Defragmenter, after Error-checking is complete. Do this by following the path of step 1, but click on Defragment now... Click on Analyze to see the amount of file fragmentation impeding performance. Windows versions older than Win7 showed a visual representation of the defragmentation process. The paging file would appear as green unmovable files. Defragging the disk in this way does NOT defrag the paging file itself, but it is important to put everything else into order now before defragging the actual paging file.
 No Paging File
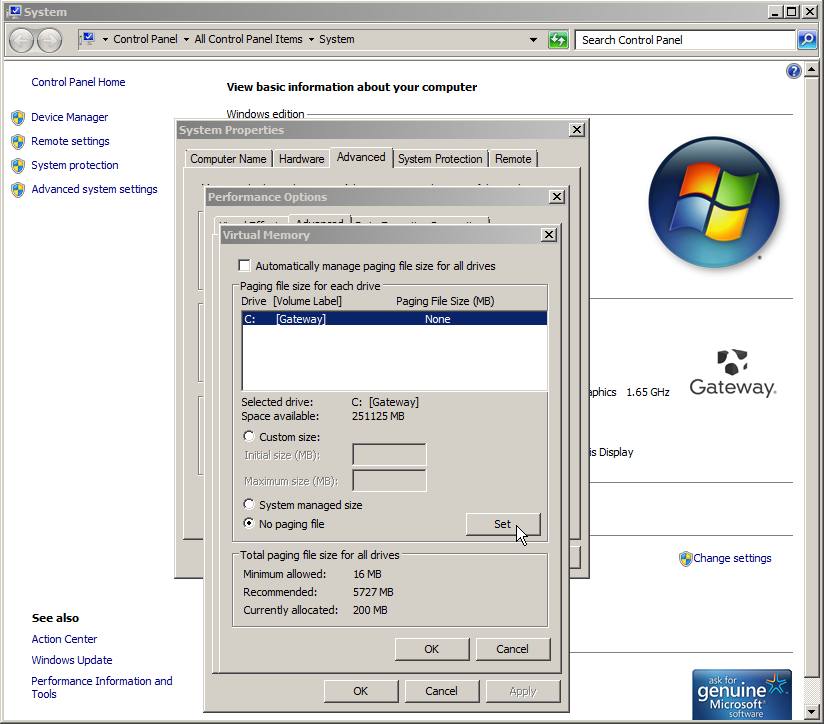
3. Remove the paging file allocation, temporarily zeroing it out. Right-click My Computer go to Properties\Advanced\Performance Settings\Advanced, then click to change Virtual Memory. Note: when you click on Advanced system settings, you may get a User Account Control pop up, click Yes. Select the radio button for No paging file, click Set, followed by OK. If this action opens a System Properties window, click Yes then OK.
a. Click the Start menu, in Windows 7, right-click Computer, left-click Properties\Advanced System Settings, then on Yes. Under Performance, click on Settings. Under the advanced tab, click on Change... b. Move the cursor to the right-side of the screen, in Windows 8, to reveal Search, Make sure Apps is selected then type System. Click on System in the results. 4, Click to Restart now, after closing out all open windows. Standby to initiate Safe Mode by manually restarting the computer, in the absence of this "Restart now" pop up window.
5. Open Disk Defragmenter again, after restarting. This time, defragging the hard drive also includes the memory formally allocated as the Pagefile. This process will take a while, and you may have to move the mouse from time to time in order to keep your computer from going into standby. Avoid the temptation to stop the process, let it run to completion then close the program.  Custom Paging File Size
6. Reset the Pagefile size, by following the path in Step 3. In Windows 7 & 8, you can select the box at the top to automatically manage paging file size for all drives. You can also set your own size limits, by ticking the radio button next to Custom size and entering the numbers. Or, you can let the system manage the size for you on a real-time basis. Microsoft recommends that the initial size equal the amount of installed RAM plus 300MB, and a maximum size equal to three times the amount of installed RAM. (See Windows Help and Support; Paging File, Preventing low memory problems)
Tips:
* Example: 4GB installed RAM; set initial size to 4300MB, maximum size to 12000MB. * WinXP Pro 32-bit with 2GB RAM, maximum size limited to 4096MB. * This process, unfortunately, should be repeated every few Months, depending on your usage. * If the fragmented files report identifies files in system restore; consider turning off disc monitoring, deleting those [all] fragmented restore points, before restoring disc monitoring once the system is clean. * Deleting system restore points also removes Trojan viruses planted there by a previous infection. * Win XP Pro, 32-bit, supports up to 2GB RAM; 64-bit supports a bit more. * Win 7 & 8 64-bit operating systems support much more RAM, limited only by the processor. Warnings: * Never leave the paging file size allocation 00 except during this defragging process. Reset afterwards! Copyright 03/17/2013 All Rights Reserved. Questions? Comments? Contact Me Related Articles: Computer/Internet |
|