How to Frame a Dormer
Frame a Dormer
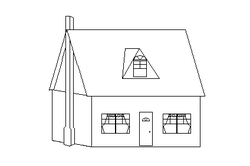
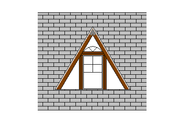
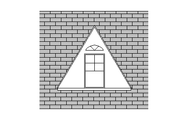
Improve the look and curb appeal of your House, by breaking up the roof line and adding a Dormer. A Dormer allows natural light into your Attic. Also, an ideal addition if converting you attic into living space.
'How to Frame a Dormer' was intended to provide a basic understanding of the framing supports and materials required to install an A-Frame Dormer. In this example, the Dormer depicts an addition to a pre-existing structure. However, these same principles also apply to new construction. Use this DIY guideline for informational purposes only!
'How to Frame a Dormer' was intended to provide a basic understanding of the framing supports and materials required to install an A-Frame Dormer. In this example, the Dormer depicts an addition to a pre-existing structure. However, these same principles also apply to new construction. Use this DIY guideline for informational purposes only!
|
Things You'll Need:
* Lumber & Fastener Dimensions, depend on existing construction * 1/2" OSB/Plywood Underlayment * 2x4's & 2x?'s * Matching Shingle & Siding * Roofing & Trim Nails * Wood Screws * Nail Plates * Strong-Tie Brackets * Screw Gun * Roof Apron & F-Style Drip Edge * EPDM Rubber Flashing Membrane |
* Mastic/Rubber Adhesive * 1/8" notched trowel * SawZall * Circular Saw * Hammer * Nail Cutter * Level * Carpenter's Square * Chalk Line * Utility Knife * Custom Window * Caulk & Caulk Gun |
#ad |
#ad |
 Transfer outlay Transfer outlay
1. Determining where your Dormer will go may be as simple as finding the center of your roof, measuring from side to side. You could decide on two Dormers of equal or distinctly different sizes. The height of your Dormer could reach your Roof's ridge; and the base level with the floor, if you found yourself so inclined. You should consider things like future electrical, telephone & cable wiring, and built in closet & storage space as well. But the most important aspect, it has to visually improve the appearance from the outside, complimenting the look of your house.
 Framing supports Framing supports
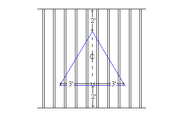
2. Transfer your outlay to the underlayment and Trusses, then add vertical supports. Matching your existing lumber, double the outermost Trusses. These create load bearing supports. Measuring from the upper and lower-most points of your outlay, allowing for doubled lumber thickness, use your level & Carpenter's Square to find and mark a horizontal line onto your verticals. Carry this line crossways, along your Trusses, between your newly reinforced upright supports. This establishes the locations of your 'Header' and 'Sill.' You will cut the Trusses along this off-set line between the reinforced uprights. Use a SawZall with a long metal-cutting blade, or a Nail/Shingle Ripper to cut all nails between the Underlayment and Trusses. This will prevent damage to the Underlayment and Roofing Felt & Shingles which would cause leaks. Install Header and Sill. Install reinforcing supports, above and below, as shown.
 Prepare surface Prepare surface
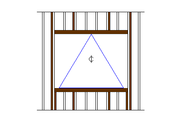
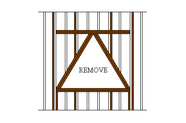
3. Cut lumber and install as doubled-diagonal supports between the Header and Sill. Install the remaining singles and doubles as shown. Once you have installed all of the framing supports, use a SawZall with a demolition blade to cut out and remove the underlayment and roofing material.
 Prepare surface Prepare surface
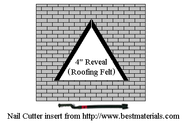
4. Use a chalk line, tape measure and utility knife to carefully mark and remove 4" of roofing shingle leaving the reveal. Using a Nail Cutter/Shingle Ripper, cut the roofing nails to separate the Felt and Shingles in a path at least 6" wide along the rising angles. Fold the Felt out of the way to expose the underlayment.
 Determine Truss angle Determine Truss angle
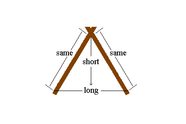
5. Determine the new Truss angle by the opening cut through the Roof. Pull a straight line from the top of the cutout, level and horizontal. Measure straight up from the Sill to the line. Call this your 'long measurement.' Now, measure the full/exposed width of the Sill, from Shingle edge to Shingle edge. Call this your 'short measurement.' To establish the correct angle, make a simple Protractor. Lay one 2x4 on top of another, and run a wood screw through both about 6" down from one end. Spread the 2x4's apart, laying a 2x4 block under the top half to keep it up off of the floor. Measure the distance from the inside of this 'Protractor' down to a straight edge, to obtain the long measurement. Spread the 2x4's until the short measurement is reached. To true this angle, check to be sure both legs of this "Protractor" are the same length. Trace the straight edge angle onto both 2x4's. Draw a line straight up through the pivot point of the Protractor. Cut the 2x4's along these lines. Connect with nail plates at the top. Taking the angle established when installing the Header and Sill, cut an upwards wedge from the bottom of both legs. Now, double this first Truss, cutting that much more off of the next set of legs.
 Blocking Blocking
6. Divide the remaining distance to the top of the opening into thirds, and build two more Trusses to size. Cut angled 2x4 blocks to fit between Trusses.
 EPDM flashing EPDM flashing
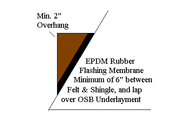
7. Insert EPDM Rubber Flashing Membrane a minimum of 6" between Shingle and Felt. With a minimum of 6" exposed, lay it over out of the way. Now, measure, cut and install OSB/Plywood underlayment. Allow for a typical 2" overhang. Lay the EPDM Flashing against the underlayment and mark a straight line. Fold the Flashing out of the way again and apply Mastic/Rubber Adhesive, using a 1/8" trowel. Bond the Flashing.
 Apply roofing Apply roofing
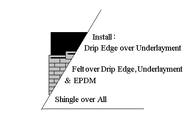
8. Install the F-Style Drip Edge. Cover the Dormer with Roofing Felt. Install new Shingles. A good Roofer knows how to weave the new Shingles into the old, to create a smooth transition over the EPDM Rubber Flashing Membrane.
 Frame window Frame window
9. Frame out the opening for your custom windows using doubled 2x4's.
 Weatherseal Dormer Weatherseal Dormer
10. Install Roof Apron, to seal the top of the Shingles below the Dormer. Apply Siding to the face of the Dormer. Caulk all gaps and seams, using a high quality/all weather product such as Geocel® Watershield Exterior Caulk.
Tips
* Design your project, then apply for the proper Building Permits. * If you hire out, be sure that your Contractor is properly Licensed, Insured and Bonded. Warnings * This DIY guideline is for informational purposes only! * Never chase something off of a roof. If you drop it, let it go and yell 'HEADS UP!' Copyright 12/20/2008 All Rights Reserved. Questions? Comments? Contact Me Related article: Exterior |
#ad #ad |