How to Install a Switched Receptacle
Switched Receptacle
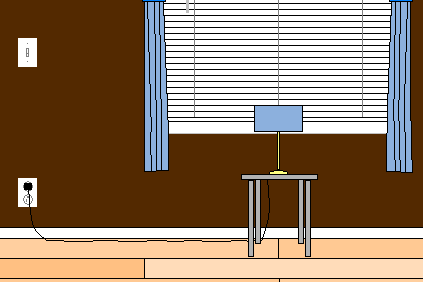
Walking into a dark house, often a hazardous adventure fraught with unseen obstacles, pitfalls and pets all too happy to greet you at the door. Instead of feeling your way around, trying not to knock over the table to reach that lamp, wouldn't it be convenient to flip a switch and instantly light up the room?
|
Things You'll Need:
* 12-2 Romex * Available 20 amp Breaker * 20 amp Duplex Receptacle * Single-pole Switch (20 amp) * Switch & Receptacle covers * 2-Single Gang Carlon Superblue Hard Body 18 cu. in. Old Work Boxes * Tape Measure * Stud Finder w/ AC Scan * Drill w/ 3/4" bit (and Flex bit if needed) * Keyhole Saw * Phillips and Standard Screw Drivers * Wire Strippers * Needle-nose Pliers |
#ad |
#ad |
|
1. Make use of an available duplex receptacle, if possible. Otherwise, this job requires installing a new circuit and a switch to control one half of it. Common household receptacles, rated 20 amps, usually wired with 12-2 Romex cable and protected with a 20 amp breaker. The light switch for this application, also rated 20 amps, even though most table or floor lamps draw no more than 15 amps. Both the switch and receptacle must handle the higher amp draw of appliances such as vacuum cleaners and 120 volt window A/C units.
 Single-Gang box
2. Installing a new receptacle, after locating the hollow between your wall studs (see Tips), measure from the floor up to the bottom of the box (typically, between 9-12 inches). Trace the open face of the single gang old work box, level against the wall, with a pencil. Wall switches commonly installed 42-44" from the floor up to the bottom of the box.
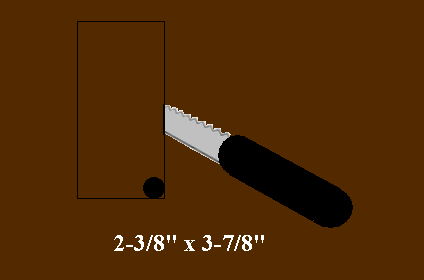 Cutout
3. Using a keyhole saw, work away from the 3/4 access hole previously drilled. Drill a second access hole in the diagonal corner, if desired. "Dry fit" your Carlon box and trim the opening as necessary. Better to start small, making the opening larger, than to over-size the opening.
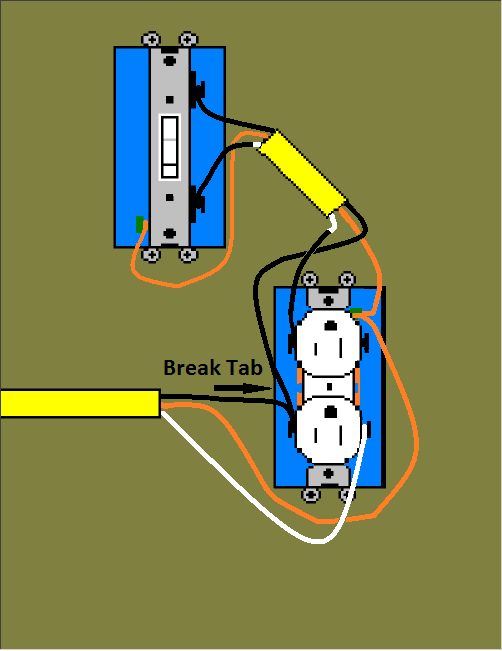 Half-switched receptacle
4. For a half-switched receptacle, wire the circuit as follows:
From the receptacle, black wire to the dark screw, white to the light-colored screw and ground to green. Use needle nose pliers to remove the connecting tab on the hot side only, separating the connection between receptacle halves. From the lower (hot) screw, or corresponding push-in receiver on the back, feed one screw of the switch (either one). Using a Sharpie permanent marker, color the white (neutral) wire black and complete the return from the opposite switch screw to the hot side of the upper half of the receptacle. Carry the ground to the switch as well. 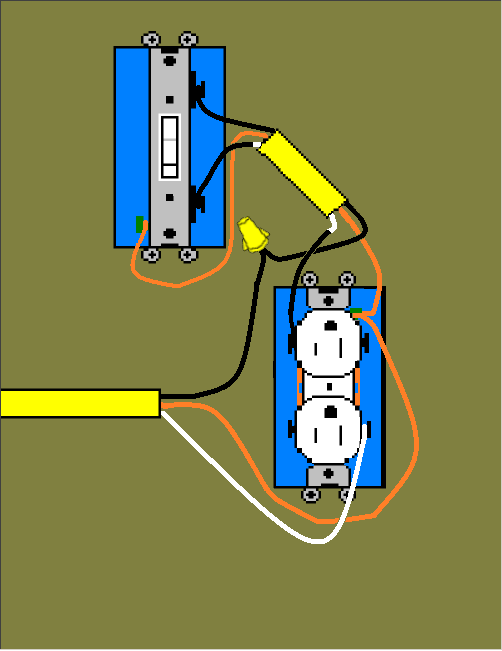 Full-switched receptacle
5. For a fully-switched receptacle, wire the circuit as follows:
From the panel (source), connect the neutral and ground to the lower half of the receptacle as normal. The black wire bypasses the receptacle, feeding one screw of the switch (either one). Using a Sharpie permanent marker, color the white (neutral) wire black and complete the return from the opposite switch screw to the hot side of the upper half of the receptacle. Remember to carry the ground to the switch. Tips
* Having difficulty locating a hidden wall stud? Measure in from an exterior wall or door frame; modern construction dictates a spacing of 16" on center. Test first with a finishing nail. Drill a 3/4" hole, insert your finger or a stiff wire to check from side to side. * You will find it decidedly easier to locate both your new receptacle and wall switch in the same hollow between wall studs. Easier yet if you have open access to an unfinished basement ceiling or attic crawl space! * Use a long flex bit to carefully drill through wall studs and bridging, to avoid plaster repairs, where necessary. (see warnings) * Install the switch in the upright position. * Installing a Dimmer switch? Use specially designed compact fluorescent bulbs or incandescent bulbs. * High amp-draw electric motors greatly reduce the lifespan of fluorescent (CFL) bulbs; use incandescent bulbs when possible. FYI: Incandescent bulbs are slowly being phased out of production, starting with 100w. bulbs. Warnings * When drilling inside of a finished wall, scan for live electrical wiring and be mindful of plumbing. * Be sure to connect to and install the breaker last, or pull the (existing) breaker of a live circuit from the panel, to avoid electrocution. * When installing Romex cable, and the wire way is off-center in unfinished 2x4 construction, remember to install nail plates to prevent electrical shorts caused by nails and drywall screws. Copyright 9/06/2011 All Rights Reserved. Questions? Comments? Contact Me Cover image color scheme by Levy Designs Related Articles: Electrical DISCLAIMER: All of my Electrical tutorials are meant for those with working knowledge of electrical wiring and should not be attempted by first-time novices. |
#ad #ad |