How to Install Outdoor Motion Lights
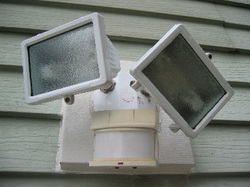
Motion Activated Light
Tired of stumbling around in the dark, trying to find your way to the car, the shed or the gas grill? Are you concerned about safety, and would like to install outdoor motion lights to discourage burglars? Well, following this tutorial, you can safely install your own outdoor lighting.
|
Things You'll Need:
* Motion Light Kit * Weather Proof Octagon Box * Wire Clamp * Wall Plate Adapter * Cordless Drill with 3/4" Spade Bit * 14-2 Romex * Wire Nuts * Rubber & Electrical Tape * Silicone Caulk * Two wood screws 1" - 1 1/2" long |
#ad |
|
1. Determine where to place your motion activated flood light for the best coverage of the area you want illuminated. Pay particular attention to the requirements of your motion sensor, regarding the maximum install height and the width angle of the sweep. 2. Locate a source of 120 volt AC electricity. Either a switched or a constant-on circuit. Run a new circuit from the panel, if there are no light circuits available. With a switched circuit, you have the ability to turn the light on for extended periods without having to trip the sensor, by flipping the switch on/off and on again. Many find this especially useful when entertaining company at night!  Motion light circuit
3. Identify the needs of your lighting circuit. Add the total wattage of the bulbs. Do not exceed 1800 watts on a 15 amp circuit, or 2400 watts on a 20 amp circuit. Lighting circuits wired with 14 gauge stranded or solid wire, insulated by flexible armored or rigid conduit, commonly consist of a hot (black), a neutral (white) and a ground (green). Armored cable often contains only the hot and neutral, while utilizing the metallic armor as the ground. Tighten all of the metal connectors securely to insure that the ground circuit reaches the (grounded) panel. 14-2 Romex, another commonly used cable, consists of insulated hot and neutral conductors with a bare ground wire. These circuits are protected by a 15 Amp Breaker, although the switch may be rated 15 or 20 amps. If your circuit demands exceed 15 amps; use 12 gauge wire, a 20 amp Breaker and a switch also rated at 20 amps. If in doubt, upgrade!
 Wiring Schematic
4. Triggering two flood lights from a single motion sensor requires connecting the red wire from the sensor to the black wires of the trailing (load) circuit. To feed a third light, connect red/black to black. Of course, all white (neutral) wires are connected together. Consult the wiring diagram included with your light kits, when connecting multiple lights & motion detectors together.
5. Wire the wall switch with the hot wires connecting to the side terminals and the ground connected to the green screw on bottom side of the metal frame. Wire nut the neutrals together, as they will bypass the switch. Install the switch in the upright position.
6. Drill a 3/4" hole through the wall where you intend to mount the fixture. 3/4" allows for the cable clamp threaded into the back of the weather proof octagon box. If you mount the fixture on horizontally grooved siding, install a wall plate adapter which locks into the groove to provide a flush mounting surface. 7. Feed at least 6" of wire through the wire connector at the fixture and fasten it securely. This protects the wire from chaffing against the box and from pulling against the wire nuts. Add the weather seal before you start connecting wires! Connect white to white and black to black. Be sure to connect the ground wires, grounding the box in the process. Twist the wires tightly together, in a clockwise direction. Screw on a properly sized wire nut. Even though there is a weather seal on the outside box and light kit, it pays to wrap the wire nuts with electrical tape. 8. Apply a bead of silicone caulk around the weather proof box to seal it to the mounting surface. Seal the wall plate to the siding. This prevents moisture from entering the back of the box or the wall cavity Tips * Be sure to aim your lights so that they illuminate the area desired. Lights can be rotated, raised and lowered to best suit the surrounding structures. * Don't forget to set the time duration and motion sensitivity before putting your ladder away. * Check with your local electrical code. Outdoor lighting may require a Ground Fault Breaker, in your area. Warnings * Do not tie into a receptacle circuit. High amperage-draw electric motors (hair dryers, vacuum cleaners, pressure washers, compressors, etc.) will dramatically shorten the life span of light bulbs. * Aim the lights away from flammable materials. Copyright 5/17/2009 All Rights Reserved. Questions? Comments? Contact Me Related Articles: Electrical DISCLAIMER: All of my Electrical tutorials are meant for those with working knowledge of electrical wiring and should not be attempted by first-time novices. |
|