How to wire multiple lights on a porch circuit
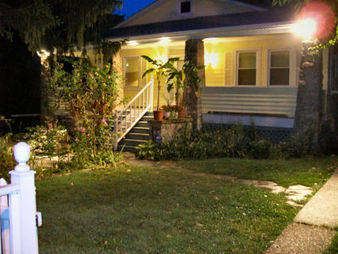
Porch Lights
Wire multiple lights on a porch circuit to include wall sconces, spotlights and floodlights. Wall sconces add warm-welcoming light to illuminate the front door and greet visitors. Spots light up the front stairs for safety. Floodlights, motion activated, add an element of security.
1. Begin this project by running power to the porch from the breaker panel; making the connection to the panel last. Power can either be run directly to the switch box or to an accessible junction box as outlined in this tutorial. Either way, the switches must be wired “hot,” in complaints with the National Electric Code (NEC).
2. Allow approximately 6” of Romex, from all branches of this circuit, inside of the junction box and switch box. This allows for easy connections. Labeling both ends of each branch, as it is run, prevents confusion. There are a total of 8 runs of 14/2 Romex cable coming together in this junction box. Adding a box extension doubles the capacity to allow plenty of extra room to make all connections easily. 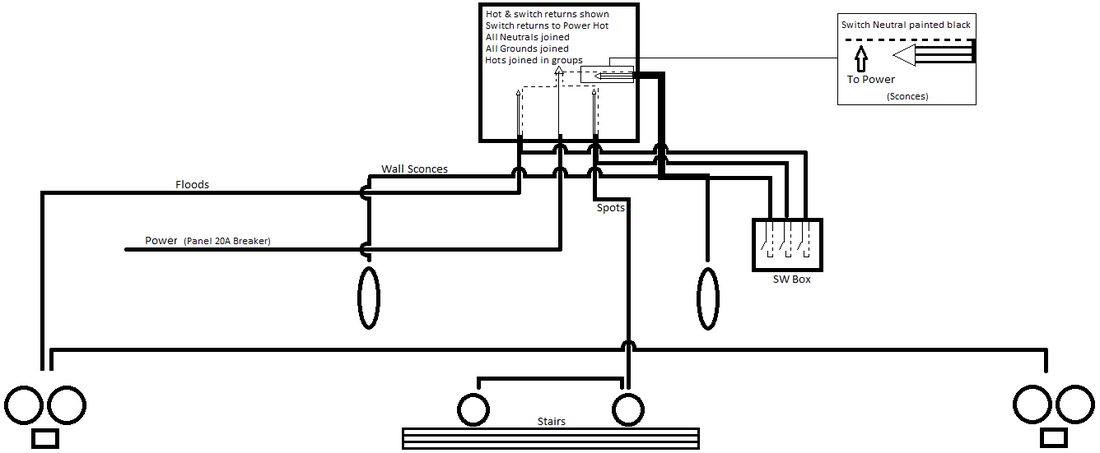 Lighting Schematic
3. Feed one light fixture from the next, in parallel. In general, this uses less wiring. But, in some cases, this may not be the easiest method. In this light wiring diagram, each of the wall sconces was wired on a separate branch, because of a finished wall. When it comes to fishing wire through an enclosed space, the fewer the better!
4. Color both ends of the Neutral (white) wires from each switch leg black, using a permanent marker. Connect these to the hot (black) wire from the power source in the junction box.
5. Connect the other end of these painted wires to the lower screw of each switch. Connecting the original black wires to the upper screws. 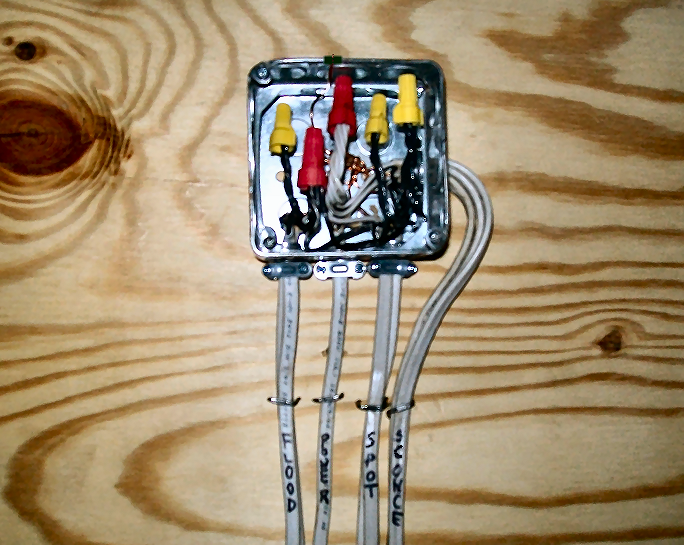 Junction Box
6. Connect the other end of these black (switch) wires to the black wires from each fixture in the junction box. Keep these separated in groups ie; floodlight switch black to black wire from floodlights, spotlight switch black to black wire from spotlights, etc.
7. Connect all Neutral (white) wires from each fixture together with the Neutral from the power source.
8. Connect all ground wires together, being sure to ground the junction box. Combine the ground wires, three or four at a time, in copper crimp sleeves, after twisting them together. 9. Connect the circuit to the 15A breaker in the panel and switch it on. Tips * If space is an issue, use a 2-Gang Old-Work Switch Box, a single-pole switch and a duplex (stacked) switch. This configuration requires a switch/receptacle combo cover plate. * This project is nearly impossible without access to the porch ceiling crawlspace! * “New work” means that the wall or ceiling is unfinished and framing is visible. "Old work" means that the wall or ceiling is finished and framing is concealed. * Most switched motion-activated floodlights can be turned on for extended periods, by turning the switch off then on again quickly. Reset by turning the switch off for 10 seconds then on again. * Ceiling fans add a nice accent, especially in the south, but electrical interference created by the motor can shorten fluorescent bulb life. * Air tight (AT) fixtures are not necessary in vented space. Warnings * Use IC (Insulation Contact), if recessed can lights come into contact with insulation. Non-IC for those which do not contact insulation. * Connect the circuit to the 15A Breaker last, to prevent accidental electrocution. * Junction boxes cannot be concealed, and must be accessible, in accordance with NEC requirements. * Do not exceed recommended bulb wattage, to prevent overheating fixtures. * Properly ground all outdoor light fixtures, switches, GFCI receptacles and steel boxes. Copyright 08/11/2012 All Rights Reserved. Questions? Comments? Contact Me Related Articles: Electrical DISCLAIMER: All of my Electrical tutorials are meant for those with some working knowledge of residential electrical wiring and should not be attempted by first-time novices. |
|