How to Re-size an Image to 424 X 282 Pixels, Without Distortion
Resize an image
Are you having problems trying to upload images outside of required size limitations? Are your images distorted afterward? Many content sites have set limitations for image size. eHow, as the example in this tutorial, once had a size limit of 424 x 282 pixels. That means that the width cannot exceed 424 pixels and the height cannot exceed 282 pixels (13.25 x 8.81 centimeters or 5.22 x 3.47 inches). However, many digital cameras save images much larger than that (3472 x 2604 pixels, in this example). There are many choices, when it comes to image editing software. Whether you purchase a program or download freeware, it must have the capability of resizing an image while maintaining the aspect ratio. It is also a great benefit, if your program has a 'One Step Photo Fix.' This will automatically correct lighting, color and contrast, making your image more appealing. Most decent programs include these features.
|
Things You'll Need:
* Good image editing software |
 Resize
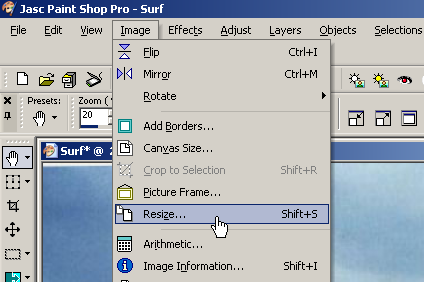
1. Open your photo in the image editing software of your choice. Your editing options may vary. Find and select the 'Resize' option, under either the 'Image,' 'Edit' or 'Tools' tab.
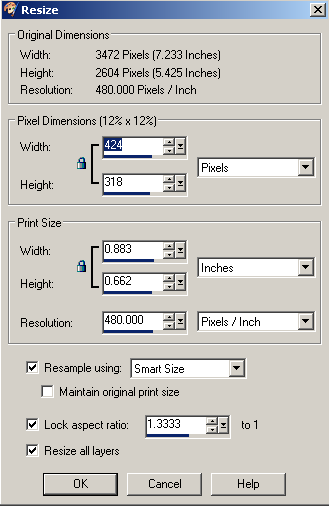
2. Select the options to Re-sample using Smart Size, Lock aspect ratio, and Resize all layers. Then, click OK to apply.
 Lock the aspect ratio
3. Use a typical photo from a digital camera to practice on. In this example, the image started out at 3472 x 2604 pixels. This will not resize to 424 x 282 pixels without distortion. Knowing that I cannot exceed 424 x 282 pixels, I set the width to 424 pixels. Since I chose to lock the aspect ratio, this resulted in an image height of 318 pixels. It will have to be cropped, to be within the limitations. After setting the new dimensions, click on 'OK.' Keep this image open and continue.
4. Select the crop tool. Click just inside of the upper left or right corner of the image and drag the cursor diagonally and downward until you reach the opposite side. The crop selection should already be 424 pixels wide. With your cursor, grab the edge marker and adjust the height to resize the image as indicated by the dimensions shown on the lower portion of the program window. This should look something like: (0,4)->(424,286)=(424,282)[1.504]--Image: 424 x 318 x 16 million. Once you have the image selected to crop, double-click inside the box to set the new size. Check the image information to verify the new size, before saving. If you need to try again, hit the Ctrl/Z keys to undue your last action. Once the new dimensions match the requirements, click to save the image.
5. Avoid cropping a portion of your image, if you would rather, by locking the aspect ratio and setting the height to 282 pixels first. The image will resize to the maximum height with a width of 376 pixels. While you may add blank margins to reach the maximum allowable width of 424 pixels; without them, your image will still conform to the requirements. Tips * In my program, I can either right-click the image itself or scroll down under the Image tab to find the image information. Your program may vary. * To keyword index your image; save the file using the proper keyword(s) befitting the image, as it pertains to your article, before you upload it and title it accordingly. Doing this allows Google Images to bring you more traffic! * You can rotate the dimensions from Landscape to Portrait (282 x 424 pixels) but do not rotate the cover image. * If you rotate an image, it is best to have enough text to extend to the bottom (for appearances) without being excessively wordy. DO NOT do this with more than one or two images per article. Warnings * If you do not watermark protect your own images, others may decide to use them for their own purposes. See my related article titled 'How to Create Watermark Protected Images.' * Never save an image until you are satisfied with the results. Copyright 10/09/2009 All Rights Reserved. Questions? Comments? Contact Me Related article: Audio/Visual - Sub Directory |
|