How to Safely Eject ReadyBoost

Safe Removal
Utilizing ReadyBoost to speed up your computer is great, unless you temporarily need that SDHC drive port for something else like transferring photos/videos from a digital camera card or music from an Mp3 player's micro-SDHC in a card adapter. Laptop computers come with one SDHC card slot and multiple USB ports, not all being 2.0 or 3.0 compatible for fast data transfer.
You'll Need:
* Windows Vista-Win 10
* Hard Disk Drive (some Solid State Drives are too fast to benefit)
* Class 10 SDHC, 1-16 GB Nano
You'll Need:
* Windows Vista-Win 10
* Hard Disk Drive (some Solid State Drives are too fast to benefit)
* Class 10 SDHC, 1-16 GB Nano
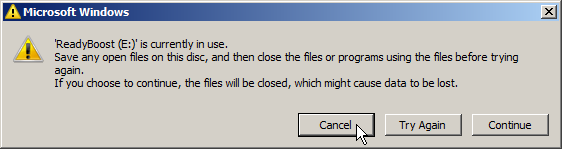 Drive in use Drive in use
1. Close the ReadyBoost Cache File (.sfcache) first, so you can eject the ReadyBoost drive without the possibility of causing file damage. A pop up window will indicate that the drive is in use and a program or file on the drive is currently open and must be closed.
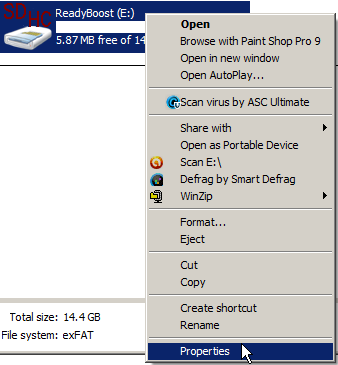 ReadyBoost Properties ReadyBoost Properties
2. Open Computer, from the Start Menu or a desktop shortcut, and locate the ReadyBoost drive. Right-click the drive and scroll down to and click on properties.
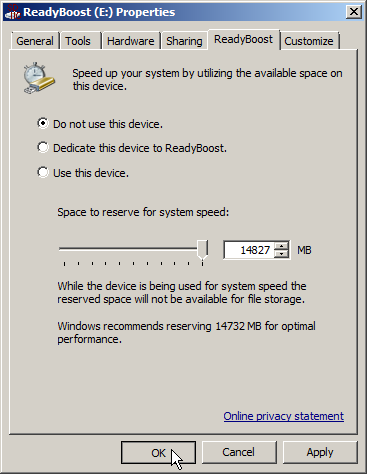 Do Not Use Do Not Use
3. Open the ReadyBoost tab and tick the radio button for Do not use this device. Click OK and the window will automatically close after applying the change.
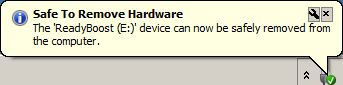 Safely Remove Hardware Safely Remove Hardware
4. Return to (My) Computer, right-click the SDHC drive and scroll down to Eject. A pop up window near the clock should indicate that the drive may now be removed.
Tips:
* Photo/Sound editing software may use enough resources to re-utilize ReadyBoost immediately, for best results. * Want to use ReadyBoost without an SDHC drive? Use a class 10 compact USB drive on a 2.0 or 3.0 port, instead and leave it installed. Warnings: * IF you take the USB drive option, long drive lengths often cause accelerated wear due to frequent removal and impact. Copyright 03/22/2015 All Rights Reserved. Questions? Comments? Contact Me Related Article: How to Improve Computer Performance |
#ad #ad |