How to Install a Chain Link Fence Gate
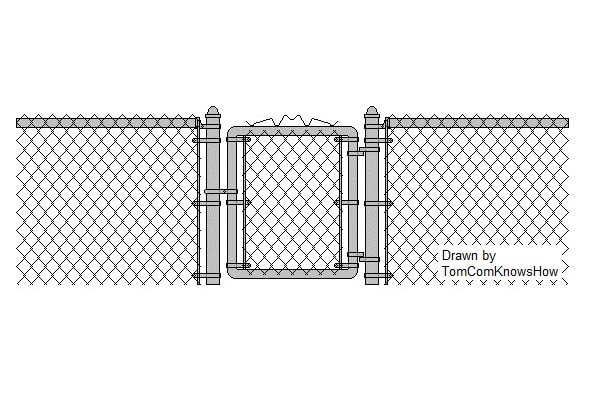
Chain link fence gate
This tutorial explains how to retrofit a chain link fence gate. You have a great chain link fence around your property. Problem is, you have such a long way to push that lawn mower to reach the existing gate. Installing another gate answers the problem!
|
Things You'll Need:
* Tape Measure * Sharpie Marker * Cordless Sawzall or Hack Saw * Bolt Cutters * 3/8" Ratchet with 9/16", 1/2" & 5/8" sockets * Post Hole Digger * 2' Level * 1 Lehigh 5/32" x 50' Multi-Color Poly Cord (spooled) * 1 bag Rapid Set® 60 Lb. Cement All™ Professional Grade Concrete Mix * 1 bag Gravel |
* Two 5-Gal. Buckets (for water & mixing concrete) * Mixing Stick * 2 Master Halco 2 3/8 x 8' Terminal Posts w/ Caps * 1 Chain Link Fencing 42"W x 48"H Walk Gate * 2 Master Halco 1 3/8" Die Cast Rail End * 1 Master Halco 2 3/8" Single Walk Gate Hardware Set * 1 Master Halco 36"-3 Hook Fence Stretcher Bar * 2 Master Halco 4' Galvanized Tension Bar * 8 Master Halco 2 3/8" Galvanized Tension Bands w/ nuts & bolts * 1 30/Bag Master Halco Aluminum Fabric Tie Chain Link |
 Chain link fence Chain link fence
1. Measure the width of your gate and add 4" for hardware. Transfer this measurements onto the top rail of your fence, wherever you decide to locate your Gate. Don't forget, this is the INSIDE measurement between your new gate posts. Slip a tension band over one of your posts and measure the overall width to the bolt hole. Add this measurement to each side of your marks, widening the space you will cut out. Install or adjust aluminum fabric ties, securing the chain link fabric on each side of the remaining top rail.
2. Use bolt cutters to snip the chain link fabric from the bottom up to the marks on the top rail. Remove the cut section. Pull out any grass to mark the locations for your fence posts. Using a sawzall, cut the measured section out of the top rail. 3. Use the poly cord to tie a straight-line between the last two fence posts, to line up your gate. 4. Dig the holes for your posts at least 18 inches deep. Pack approximately 4 inches of gravel into the holes for drainage. 5. Fill an empty 5-gallon bucket 1/2 full of concrete and mix with water to form a thick slurry. Pour this into a hole and center a post, sinking it firmly to the bottom. Use your mixing stick to work out air bubbles, voids weaken concrete! 6. Use the poly cord and a 2' level to line up the post and adjust it straight-vertical. Fill in the rest of the hole and top it off with enough concrete to form a dome to shed rain water away from the post. The posts should sit firmly enough in the concrete and not require tying in place. 7. Slide four tension bands down over each post, after the concrete has fully cured. Assemble the Die Cast Rail Ends and the top tension bands to attach the top rails to the posts at the correct height. Use a sawzall to cut the posts to the proper height, and top them off with caps. 8. Slide the tension bar down through the end weave of the chain link fabric and cut to length using bolt cutters. Keeping the carriage bolts and nuts for the tension bands handy. Using the 3 Hook Fence Stretcher Bar, hook the tension bar and pull the fence towards the posts. Fit the tension bar between the open ends of the tension bands (evenly spaced) until you can insert the nuts & bolts. Probably the most difficult part the job, especially for one person! 9. Install the gate hinges. Install the lower hinge onto the post first, with the pin pointing upwards. Attach the receivers onto the gate. Mounted at the proper height, the gate will clear the ground when swung open. Next, install the upper hinge onto the post, with the pin pointing downwards. Slide it into the receiver and tighten the carriage bolt & nut. 10. Install the gate latch. Tips * Removing several of the wire ties, holding the chain mesh to the top rail, makes it easier to pull the fence back to the new posts. * If you 'dry fit' your posts, before pouring concrete, you can measure and cut them horizontally. * Install your gate in a level section of fence. * Installing both hinge pins pointing upwards allows the gate to be picked up and removed easily. Pointing the top pin downwards prevents removal. Warnings * Measure twice, cut once! * Cutting something a little too long beats cutting it a little too short! Copyright 01/19/2009 All Rights Reserved. Questions? Comments? Contact Me Related Articles: Yard & Garden |
#ad #ad #ad |